I thought I'd write a little more about my home-grown x86-64 OS. This is about my threading mechanism.
The Task list
The global task list contains a list of 16bytes entries that contains the adress of the PML4 base
for the task and the value of the Ring0 RSP. Since task switches always occur during Ring0, only
the RSP0 needs to be saved (RSP3 will have been pushed on stack during privilege change).
Upons switching task, the scheduler will restore cr3 and rsp from the list.
Task State Segment
In 64bit long mode, the TSS doesn't have as much significance than in protected mode when hardware
context switching was available. The TSS is only used to store the RSP0 value. When a privilege
change is performed, from Ring3 to Ring0, the CPU will load the TSS.RSP0 value in RSP and the old
RSP3 value will have been pushed on the Ring0 stack. So the IRET instruction will pop out the Ring3
RSP value (hence why it is not needed in the TSS). The only time that the CPU will look into the TSS
is during a privilege switch from Ring3 to Ring0.
Only one TSS is needed in the system since the value it contains is a virtual address. Every task
will use the same address for RSP3 and RSP0 but it will be mapped differently.
So the TSS is only used to tell the process which address to use for the stack when going from Ring3
to Ring0. Since that address is the same virtual address for every task, only 1 TSS needs to be created.
There is no point in showing the TSS here since only one value is used. It's basically a 0x67 bytes long table
with a 64bit entry at byte index 4 that represents the RSP0 value. the rest of the table can be filled with zeros
Kernel and user tasks
Kernel tasks have the following properties:
- Run in ring0.
- Their Code Segment Selector is the same as the kernel.
- Each kernel task has its own stack.
- Code is located in kernel memory which is the identity-mapped portion of virtual memory.
- The RSP value that is set in the Ring0 stack (for iret) upon task creation is the ring0 stack pointer.
User tasks have the following properties:
- Run in ring3
- Their Code Segment Selector is the same for all user thread.
- Their Code Segment Selector has DPL=3
- Each user task has 2 stacks: one for Ring0 and one for Ring3
- Code is relocated at load time and appears to be running at virtual address 0x08000000
- The RSP value that is set in the ring0 stack (for iret) upon task creation is the ring3 base stack pointer.
Interupts
When an interrupt occurs, the Trap or Interrupt Gate contains a DPL field and target Selector field. The DPL
will always be set to 3 so that any privilege levels (Ring0-Ring3) can access the interrupt handler. The target
selector is for a Code Segment Descriptor (inthe GDT) with a DPL value of 0. This will effectively run the
handler in Ring0.
Interrupt or task switch during user task
If the interrupt occured during a user task, the task may have been in Ring3 or in Ring0 if in the middle of a
system call. If a privilege change occurs, the value of RSP will be set to the value in the TSS for RSP0. That
value is the same for all tasks but mapped differently to physical memory. The ring3 stack will be left untouched.
If there is no privilege change, then the same stack will be used. The scheduler algorithm doesn't need to change
since the Ring3 stack's RSP has been pushed sometime before when entering Ring0 (ie: when calling a system
function)
Interrupt or task switch during kernel task
If the interrupt occured during a kernel task then nothing special happens. The same stack is being used and same
protection level is applied. Although it would be possible to use the new ITS mechanism to use another stack
during interrupt handling. This would be usefull, for example, when a stack overflow occurs in a kernel thread
and the #PF exception is raised. If there is not stack switch, then the return address can't be pushed on the stack
since the stack if faulty (hence the #PF). So using another stack for interrupts would be a wise choice. But
I'm not implementing this for now.
Task switch
A task switch will always be initiated by the timer iterrupt. The scheduler runs in Ring0 so the
Ring0 stack is used. If the interrupted task was in Ring3, we don't need to worry about its stack
since RSP has been pushed on the Ring0 stack.
The current CPU context will be saved on the Ring0 stack. Therefore, the scheduler will always save the RSP
value in the tasklist's rsp0 entry since it occurs in ring0 code. Upon resuming the task, RSP will be reloaded from
the rsp0 entry, context will be restored and the iret instruction will pop the ring3 RSP to resume execution.
In a multi-cpu system, it would be possible to have less threads running than the number of CPUs. In that case, upon
task-switching, a CPU would just continue to run its current thread, giving 100% of its time to that thread. But for
other CPUs that don't have any task to execute, they should get parked. Once a CPU's thread is terminated, if
there is no other threads to run for him, then it will parked. Normally the CPU would load the context
of the next task but instead it will simply jump to a park function. Since the scheduler is invoked
through an interrupt, we eventually need to "iret". But in the case of parking, we will just "jmp" to a
function and spin indefinitely. The iret instruction would restore flags and pop out the stack a jump to a return
address but in this case we don't want to do any of that. Since there are no flags to restore, no return function
and no stack to clean. The park function does the following:
- load kernel PML4 base address in cr3 to restore identity paging
- load RSP with a stack unique for the current CPU
- acknowledge interrupt (APIC or PIC)
- restore interrupt-enable flag (cleared when entering handler)
- spin-wait with "hlt" instruction.
parkCPU:
    // Set back the kernel page tables,
    mov         $PML4TABLE,%rax
    mov         %rax,%cr3

    // set back the cpu's stack. This could be
    // optimized but kept the way it is for clarity purposes.
    // We're parking the CPU... it's not like we need the performance here
    mov         APIC_BASE+0x20,%eax
    shr         $24,%eax
    mov         %rax,%rsp
    shl         $8,%rsp
    add         $AP_STACKS,%rsp

    // re-enable interrupts and set some registers for debug and wait
    mov         $0x11111111,%rax
    mov         $0x22222222,%rax
    mov         $0x33333333,%rax
    call        ackAPIC
    sti
1:  hlt
    jmp         1b
Since interrupts are re-enabled and APIC has been ack'd, we will continue to be interrupted by the timer
and we are ready to take on a new task at any time. It would be wise to warn the parked CPU about
newly created tasks (with IPIs) so we don't need to wait until the timer to kick in. But that's for
another day.
Creating a new task
When a new task is created, memory is allocated for its stack and code. An initial context is setup
in the newly created stack. All registers are initialized to 0. Since the task will be scheduled by an interrupt handler,
it needs to have more data initilased in the stack for proper "iret" execution. Of course, the RSP value saved
in the task list will be the bottom of that context in the task's stack.
The initial stack looks as follow:
| Stack top |
| 152 |
SS |
0 for kernel thread / Ring3 selector for user thread |
| 144 |
RSP |
Ring0 stack top or Ring3 stack top |
| 136
| RFLAGS |
0x200202 |
| 128 |
CS |
Ring0 Code selector or Ring3 Code selector |
| 120 |
RIP |
entry point for Kernel thread / 0x080000000 for User thread |
| 112 |
RAX |
0 |
| 104 |
RDI |
0 |
| 96 |
RBX |
0 |
| 88 |
RCX |
0 |
| 80 |
RDX |
Parameter to pass to thread on load |
| 72 |
RSI |
0 |
| 64 |
RBP |
0 |
| 56 |
R8 |
0 |
| 48 |
R9 |
0 |
| 40 |
R10 |
0 |
| 32 |
R11 |
0 |
| 24 |
R12 |
0 |
| 16 |
R13 |
0 |
| 8 |
R14 |
0 |
| 0 |
R15 |
0 |
| Stack bottom |
Scheduling algorithm
My scheduling algorithm is nothing fancy. Just the good old round-robin way. But on multi-processor, it is probably the worse
thing you could do. Here is an example task list (Note that I should also use a linked list instead of a fixed size table)
| Task1 |
| Task2 |
| Task3 |
| Task4 |
| Task5 |
As this table show, each task except Task5 are running on one of the 4 CPUS. At the next schedule(), the task list will look like this:
| Task1 |
| Task2 |
| Task3 |
| Task4 |
| Task5 |
The problem here is that Task 1,2 and 3 are still running. So doing a context switch imposed a large overhead for no reason.
But the fact that they are still running is good, but they are not running on the same CPU anymore. So they will never
fully benefit from the CPU cache since memory will need to be fetched all over again because that CPU had no idea about
the code and data being used by the task. A better algorithm would detect that the task should continue to run on the same CPU.
I need to take the time to think about it.
Ring 3 tasks
To make a task run in ring3, it needs the following
- A "non-conforming" code segment descriptor with DPL=3.
| 63 |
Irrelevant |
1 | 0 | 0 | 0 | Irrelevant |
48 |
| 47 |
P:1 | DPL:3 | 1 | 1 | C:0 | R:1 | A:0 |
Irrelevant |
32 |
| 31 |
Irrelevant |
16 |
| 15 |
Irrelevant |
0 |
- cs must be loaded with RPL=3
| 15 |
GDTIndex15:3 |
TI:0 | RPL=3 |
0 |
- A writable data segment with DPL=3. This is for the stack.
| 63 |
Irrelevant |
1 | 0 | 0 | 0 | Irrelevant |
48 |
| 47 |
P:1 | DPL:3 | 1 | 0 | E:0 | R:1 | A:0 |
Irrelevant |
32 |
| 31 |
Irrelevant |
16 |
| 15 |
Irrelevant |
0 |
- ss must be loaded with RPL=3
| 15 |
GDTIndex15:3 |
TI:0 | RPL=3 |
0 |
- The task register must be loaded with a valid tss selector. The TSS should be initialzed with a valid RSP0 value
for when the code switches to Ring0 (interrupts). TSS Descriptor:
| 63 |
base31:24 |
1 | 0 | 0 | 0 | 0 |
48 |
| 47 |
P:1 | DPL:3 | 0 | 1 | 0 | 0 | 1 |
base23:16 |
32 |
| 31 |
base15:0 |
16 |
| 15 |
0x67 |
0 |
Please refer to Intel 64 and IA-32 Architectures Software Developer's Manual Volume 3 for more information
These values would be on the stack prior to invoking "iret" from the scheduler. The scheduler runs in
ring0, hence why the RPL value in selectors is important
Memory layout
The kernel's page tables is as follow:
- The first 128mb is identity mapped using 2mb pages (first 64 page directory entries).
- The rest of the available memory is identiy mapped with 4k pages.
- The whole memory is again identity mapped, using 2mb pages, at 0x4000000000.
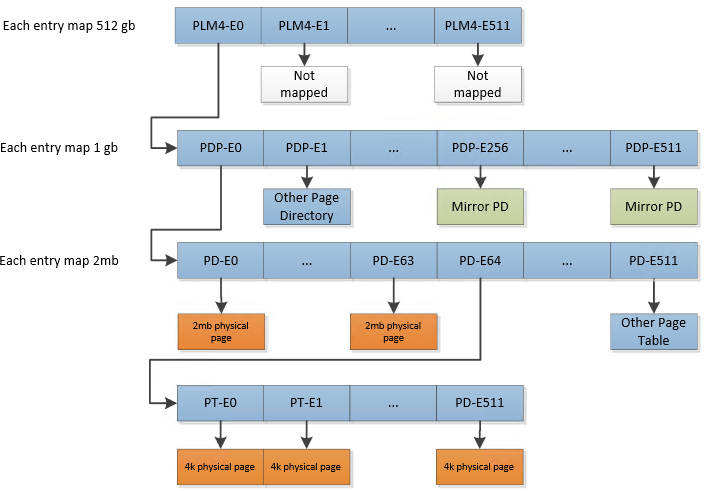
The kernel's 4k pages is only used to track free pages to be distributed to requesting threads.
Each 4k page entry has its 3 AVL bits cleared. This is how the kernel keeps track of available memory.
A page with non-zero AVL is in use.
So when a process needs to create a new page, it does the following:
- look through the kernel 4k pages structure for a free page. Mark is as not-free
- look though the process 4k pages structure for a free page. Mark is as not-free
- take the physical address of the kernel page (easy since it is identity mapped)
and store it in the process page entry. The process's page now maps to the proper physical page.
The AVL bits are set as follow:
- 0b000: physical memory pointed to by this page is free to use
- 0b001: physical memory pointed to by this page is also mapped somewhere else and is a stack page for a thread
- 0b010: physical memory pointed to by this page is used by the kernel
- 0b011: physical memory pointed to by this page is used as heap for a thread or the kernel
Creating a process
When creating a new process, the process code will start at 0x8000000. So the kernel will reserve a physical
page (as per the process in step 1 above). The physical address of that page will be used in the process's page
entry for address 0x8000000. This should correspond to Page Directory entry #64. Since the first 64 entries
are 2mb pages and the rest are pointers to page tables, then this virtual address maps to a 4k page.
So all processes will see their entrypoint at 0x08000000 but they will obviously be mapped to different
physical pages. This allows to to compile position dependant code and run it in the OS.
Whole memory identity mapping
Each process have their own virtual address mapping.
If a process calls a system function that needs to manipulate physical
memory this causes a problem. For example, if a process wants to allocate memory, it needs to access it own page tables.
but the pages reside above kernel memory so it is not mapped into process virtual addressing space. The same can happen
when trying to create a process: The system call will reserve a virtual address in its page tables,
which is identity mapped, but then it will attempt to fill in some data in the physical page,
that physical page resides above the kernel memory, so it is not mapped in the process. for example:
- Kernel memory ends at 0x08000000. Kernel page tables are 0x00020000.
- The kernel page tables is just a list of identity mapped pages above kernel memory
with the AVL field indicating if the page is available.
- The first entry maps to physical location 0x08000000. So when searching for a free page, the kernel will
find, for example, an entry at 0x00020B00 with the AVL bits set the "free".
- This entry maps to 0x08000000+(4096*(B00/16)) = 0x080B0000.
- The process would like that physical address to be mapped to 0x08001000 and fill it with zeros.
Two problem arises:
- The process cannot modify its page table to write an entry for 0x08001000 since
its page tables are not mapped.
- It cannot fill the page with zeros prior to map it since the page is not mapped and it
cannot access 0x080B0000 directly because this is a physical address and it would be interpreted
as a virtual address by the CPU.
The solution is to keep an indentity mapping of the whole memory at some other address. Lucky for us, with 64bit
addressing we have a very large address range. So identiy mapping will start at 0x4000000000 (256th gig).
That address will map to physical address 0x00000000. So by getting the PLM4 address from cr3 and
adding 0x4000000000 (or simply setting bit38), the process can now access its page tables.
Dynamic stack growth
A user thread is created with a 20mb stack but only the 4 pages are allocated (commited to physical memory).
If the thread attempts an access below that 16k, a Page Fault exception (#PF) will occur since the page will
not be mapped (unless the access went as far down as the heap,in which case corruption would happen). The #PF
handler will then allocate a page for that address
My implementation is rather simple. It allocates
physical pages upon page faults and that's it. The only protection it does is
to check if the address is in the page guard. The page guard is a non-present
page between the heap top and stack bottom. If a stack operation would
fall in that page, then the OS detects this as a stack overflow. But there is
nothing that protects a task to do something like "movq $1, -0x1000000(%rsp)".
This could fall below the page guard and corrupt the heap. Same thing for the heap.
Nothing prevents a task from writting to an address that falls in the stack.
So the the page guard is a best-effort method.
It would be nice if the Exception error code would tell us if this operation was using rbp or rsp,
or any implied usage of the ss segment segment selector.
for example, all these operations should be recognized as stack growth demand:
- push %rax
- mov %rax,(%rsp)
- mov %rax,-5000(%rbp)
- mov %rax,-5000(%rbp)
- And to some extent: lea -10000(%rsp),%rax; mov %rbx,(%rax)
To make sure that we touch the page guard, we need to do Stack Probing:
// This would be dangerous
void test1()
{
    char a[0x2000];
    a[0]=1;
}

// This would be safe.
void test1()
{
    char a[0x2000];

    // the fact that we access a page that is no further than 0x1000 from
    // the bottom of the stack will make the #PF correctly create the page
    // Doing this is called Stack Probing
    a[0x1001] = a[0x1001];
    a[0]=1;
}
It's impossible to detect all those conditions. So unfortunately, it is not possible to detect if the
demand is for a legitimate stack growth, stack overflow or heap overflow. So we just blindly allocate the page
and give it to the requesting task.
After trying to find an alternate solution, I found out that apparently Windows and linux are facing the same dillema.
Apparently, my algorithm is good. When compiling a C application
under those OS, the compiler will detect if the program tries to allocate more than one page on the stack and
will generate "stack probing" code. So Stack Probably is a well-known technique to work around that limitation.
But if you write a ASM application under linux or windows, then you need to take care of that.
Another possible way I will eventually explore is to set the stack memory at virtual location 0x1000000000000.
By looking at bit 47of the offending address, I would get a strong hint about this being a stack operation.
This means the OS couldn't support systems with more than 256 terabytes of RAM.... It also has other downsides.
I recently added multi-processor support in my homebrew OS. Here are the technical details. BTW:
Chapter 8 and 10 of the Intel Manual 3 are probably your best resource.
When the system starts, all but one CPU is halted. We must signal the other CPUs to start.
I won't go into the details of how to bootstrap the processor, that step is easy: just
go in protected mode then setup paging and jump to long mode. This is very well covered in the Intel
manuals.
Basically, this is how we switch to protected mode
    // Before going any further, you must enable the A-20 line. Not covered in this example

    push    %cs     /* remember, cs is 07C0*/
    pop     %ds
    mov     $GDTINFO,%eax
    lgdtl   (%eax)
    mov     %cr0,%eax
    or      $1,%al
    mov     %eax,%cr0   /* protected mode */
    mov     $0x08,%bx

    // far jump to clear cache
    ljmpl   $0x10,$PROTECTEDMODE_ENTRY_POINT


GDTINFO:
     // GDT INFO
    .WORD 0x20
    .LONG . + 0x7C04    /*that will be the address of the begining of GDT table*/

    // GDT
    .LONG 00
    .LONG 00

    // GDT entry 1. Data segment descriptor used during unreal mode
    .BYTE 0xFF
    .BYTE 0xFF
    .BYTE 0x00
    .BYTE 0x00
    .BYTE 0x00
    .BYTE 0b10010010
    .BYTE 0b11001111
    .BYTE 0x00

    // GDT entry 2. Code segment used during protected mode code execution
    .BYTE 0xFF
    .BYTE 0xFF
    .BYTE 0x00
    .BYTE 0x00
    .BYTE 0x00
    .BYTE 0b10011010
    .BYTE 0b11001111
    .BYTE 0x00

    // GDT entry 3. 64bit Code segment used for jumping to 64bit mode.
    // This is just used to turn on 64bit mode. Segmentation will not be used anymore after 64bit code runs.
    // We will jump into that segment and it will enable 64bit. But limit and permissions are ignored,
    // the CPU will only check for bit D and L in this case because when we will jump in this, we will
    // already be in long mode, but in compatibility sub-mode. This means that while in long mode, segments are ignored.
    // but not entiorely. Long mode will check for D and L bits when jumping in another segment and will change
    // submodes accordingly. So in long mode, segments have a different purpose: to change sub-modes
    .BYTE 0xFF
    .BYTE 0xFF
    .BYTE 0x00
    .BYTE 0x00
    .BYTE 0x00
    .BYTE 0b10011010
    .BYTE 0b10101111  // bit 6 (D) must be 0, and bit 5 (L, was reserved before) must be 1
    .BYTE 0x00
This is how we switch to long mode
PROTECTEDMODE_ENTRY_POINT:
    // Before going any further, you must  setup paging structures.
    // Not covered in this example since it is very easy and well document
    // in the Intel manuals
    mov     $8,%ax
    mov     %ax,%ds
    mov     %ax,%es
    mov     %ax,%fs
    mov     %ax,%gs
    mov     %ax,%ss

    // set PML4 address
    mov     $PML4TABLE,%eax
    mov     %eax,%cr3

    // Enable PAE
    mov     %cr4,%eax
    or      $0b10100000,%eax
    mov     %eax,%cr4

    // enable long mode
    mov     $0xC0000080,%ecx
    rdmsr
    or      $0b100000000,%eax
    wrmsr

    //enable paging
    mov     %cr0,%eax
    or      $0x80000001,%eax
    mov     %eax,%cr0
    ljmpl   $0x18,$LONG_MODE_ENTRY_POINT
So at this point, the kernel is running in 64bit long mode.
Detecting the number of CPUs
The first thing to do is to detect the number of CPUs present. This can be done
by looking for the "MP floating pointer" structure. It is located somewhere in in the BIOS
address space and we must find it. I won't go into the details of the structure since it is
very well documented everywhere. The MP structure contains information about the CPUs and IO APIC
on the system. This structure is filled in by the BIOS at boot time. The structure can be at many
places hence why we must search for it in memory. It starts with "_MP_" and contains a checksum, so
by scanning the memory, you will find it. The important thing to know is that you do the following:
- Find the structure in memory. According to the specs, it can be in a couple of different places.
- Detect number of CPUs and Local APIC address of CPUs
- Detect IO APIC address.
For more details on how to find the structure and its format, make a search for "Intel Multi-Processor Specification".
When wandering in the SMP world, you must forget about using the PIC (Programmable Interrupt Controller)
The PIC is an old obsolete device anyway. The new way now is the use the APIC. So we won't be using
the PIC anymore. There is a notion of a local APIC and the IO APIC. The local APIC is an APIC
that is present on each CPU. The local APICs can be use to trigger interrupts from one CPU to
another, as a way of communication. When the system starts, all but one CPU is halted.
We must signal the other CPUs to start. The PIC could not allow us to do that, hence
why we must use the APIC. The local APIC will allow us to trigger an interrupt on the other CPUs
to get them out of their halted state.
We must then setup the local APIC for the current CPU. Each CPU have their own APIC and their
APIC is mapped at the same address for each CPU. The local APIC address is 0xFEE00000.
So when CPU0 read/writes at 0xFEE00000 it is not the same as if CPU1 read/write at 0xFEE00000
since the address maps to each CPU's own APIC. This is nice because it means
you dont need to do something like "What CPU am I? number x? ok, then use address xyz then."
Each CPU only need to write at the same address and they will be guaranteed to write to their
own APIC. It's all transparent so you don't need to worry about it. The address of the IO APIC
maps to the same IO APIC for all CPUs though. But that's also good because all CPUs
want to use the same IO APIC anyway.
    mov     $APIC_BASE,%rdi
    mov     $(SPURIOUS_INTERRUPT_VECTOR | 0x100), %rax   // OR with enable flag
    mov     %eax,APIC_REG_SPURIOUSINTERRUPTVECTOR(%rdi)
Then, we start the APs
    #define WAIT(x) push %rcx; mov $x,%rcx; rep nop; pop %rcx;
    #define STALL() 1337: hlt; jmp 1337b;
    #define COUNT_ONES(regx,regy) push %rcx; \
        xor regy,regy; \
        1337:; \
        cmp $0,regx; \
        jz  1338f; \
        inc regy; \
        mov regx,%rcx; \
        dec %rcx; \
        and %rcx,regx; \
        jmp 1337b; \
        1338:; \
        pop  %rcx


    mov     $APIC_BASE,%rdi
    mov     $0xC4500, %rax              // broadcast INIT to all APs
    mov     %eax, APIC_REG_INTERRUPTCOMMANDLOW(%rdi)
    WAIT(100000000)                     //1 billion loop should take more than 10ms on a 4ghz CPU
    mov     $0xC4600, %rax              // broadcast SIPI to all APs
    mov     $SMP_TRAMPOLINE,%rcx
    shr     $12,%rcx
    and     $0xFF,%rcx
    or      %rcx,%rax
    mov     %eax, APIC_REG_INTERRUPTCOMMANDLOW(%rdi)

    mov     STARTEDCPUS,%rbx
    COUNT_ONES(%rbx,%rdx)
    cmp     CPUCOUNT,%rdx
    jz      1f
    mov     %eax, APIC_REG_INTERRUPTCOMMANDLOW(%rdi)
    WAIT(100000000)
    mov     STARTEDCPUS,%rbx
    COUNT_ONES(%rbx,%rdx)
    cmp     CPUCOUNT,%rdx
    jz      1f
    //CPUs are not all started. should do something about that
    STALL()
1:
The SMP_TRAMPOLINE constant is the address of where I want the APs to jump to when starting. This address must be aligned
on a 4k boundary because we the SIPI message takes the page number as a parameter. Hence why I SHR the address by 12 (div by 4096).
And since the APs will start in 16bit mode, the address must reside under the 1meg barrier. STARTEDCPUS is a 64bit bitfield
that represents the CPUs. Each bit get set by the APs (cpuX sets bit X).
Application processors trampoline code
I decided to put the Application Processor's trampoline code in the bootloader (I've got 512bytes of room, that
should be enough). The bootloader is a good decision beacause it is below the 1meg mark, the source file is
compiled as 16bit code and all the initialisation is done there anyway. But when an AP starts, it will
be given a start address aligned on a 4k page boundary and the bootloader is at 0x7C00. So the bootloader
will copy a "jmp" at 0x1000 to jump to the bootloader AP init function. So the order of execution is:
- AP receives SIPI with vector 0x01
- AP jumps to 0x1000
- Code at 0x1000 will make AP jump to 0x7C0:
- AP will switch protected mode and jump to KernelMain
- KernelMain will check in MSR[0x1B] if this is an AP or the BST. if BST, then jump to normal initialisation
- setup the temporary stack for the AP's thread of exeuction: 0x70000+256*APIC_ID (256 bytes stacks)
- enable long mode (64 bit)
- set CPU started flag in global variable: STARTEDCPU = STARTEDCPU | (1<
So now I have multiple processor ready for work. The next step is to make a SMP compatible scheduler and start
using the IO-APIC. I'll cover that another time.
DHAS
During the past months, I've been working on my Home Automation System. I did some major refactoring and moved away from the rPi.
I am now running my home automation software on a x86-64 server.
The projects is hosted on github at https://github.com/pdumais/dhas.
The system uses a modular architecture now. I like to think of DHAS as a hub for different technologies. Since my home automation system is mix of Insteon devices, ethernet relays and temperature sensors, IP phones, and more, I made a central software that can interface with all those technologies. Each module is responsible for interfacing with one technology. on github, you will find these modules under the src/module folder.
Everytime I need to add a new kind of module, I just create the class and it automatically gets instanciated and used. The modules register their own REST callbacks and the REST engine being self-documenting will show the newly added functions when querying the help API. This way, the system doesn't know anything about its modules. It only knows that it is running modules. So adding new modules becomes very easy because the work is isolated from the rest of the system.
The most simple module to look at is the Weather Module.
Arduino
Since I am not using the rPi anymore, I needed to find a way to get GPIOs on the server. So I bought an Arduino Leonardo and made a very simple firmware that presents the device as a CDC device using the LUFA library. The source code for the firmware is here:
main.c
#include "usblib.h"
#include
#include

#define STABLE 100

uint8_t currentData = 0;

/*
Sent byte to host:
bit     Arduino pin     AVR Pin
0           2               PD1
1           4               PD4
2           7               PE6
3           8               PB4
4           12              PD6


relays:
    'a' -> arduino 10 -> PB6   ; 'a' = ON, 'A' = off
    'b' -> arduino 11 -> PB7   ; 'b' = ON, 'B' = off
to test the live stream: cat /dev/ttyACM0 | xxd -c1
*/

void setCurrentData(uint8_t data)
{
    currentData = data;
}

void sendCurrentData()
{
    SendCDCChar(currentData);
}

int main(void)
{
    uint8_t pb,pd,pe;
    uint8_t newData = 0;
    uint8_t lastData = 0;
    char stabilizerCount = -1;

    InitCDC();
    sei();

    // Set pins as pullups
    PORTB |= ((1<<4));
    PORTD |= ((1<<1)|(1<<4)|(1<<6));
    PORTE |= ((1<<6));
    // Set pins as input
    DDRB &= ~((1<<4));
    DDRD &= ~((1<<1)|(1<<4)|(1<<6));
    DDRE &= ~((1<<6));

    // set PB6 and PB6 as output
    DDRB |= (1<<6)|(1<<7);
    PORTB |= (1<<6)|(1<<7); // initially off (high = off)


    uint8_t receivedChar;
    while (1)
    {
        pb = PINB;
        pd = PIND;
        pe = PINE;

        newData = ~(((pd>>1)&1)|(((pd>>4)&1)<<1)|(((pe>>6)&1)<<2)|(((pb>>4)&1)<<3)|(((pd>>6)&1)<<4));
        newData &= 0x1F; // clear 3 top bits since we don't use them

        if (GetCDCChar(&receivedChar))
        {
            if (receivedChar == '?')
            {
                sendCurrentData();
            }
            else if (receivedChar == 'A')
            {
                PORTB |= (1<<6);
            }
            else if (receivedChar == 'B')
            {
                PORTB |= (1<<7);
            }
            else if (receivedChar == 'a')
            {
                PORTB &= ~(1<<6);
            }
            else if (receivedChar == 'b')
            {
                PORTB &= ~(1<<7);
            }

        }

        // debounce
        if (lastData != newData)
        {
            lastData=newData;
            stabilizerCount = STABLE;
        }
        if (stabilizerCount>0) stabilizerCount--;
        if (stabilizerCount==0)
        {
            stabilizerCount=-1;

            if (currentData != newData)
            {
                setCurrentData(newData);
                sendCurrentData();
            }
        }

        CDCWork();
    }
}
usblib.c
#include "usblib.h"
#include
#include
#include
#include
#include "Descriptors.h"
#include
#include
#include
#include
#include

USB_ClassInfo_CDC_Device_t VirtualSerial_CDC_Interface =
{
.Config = {
    .ControlInterfaceNumber = INTERFACE_ID_CDC_CCI,
    .DataINEndpoint = {
        .Address = CDC_TX_EPADDR,
        .Size = CDC_TXRX_EPSIZE,
        .Banks = 1,
    },
    .DataOUTEndpoint = {
        .Address = CDC_RX_EPADDR,
        .Size = CDC_TXRX_EPSIZE,
        .Banks = 1,
    },
    .NotificationEndpoint = {
        .Address = CDC_NOTIFICATION_EPADDR,
        .Size = CDC_NOTIFICATION_EPSIZE,
        .Banks = 1,
    },
},
};

void CDCWork()
{
    CDC_Device_USBTask(&VirtualSerial_CDC_Interface);
    USB_USBTask();
}

uint8_t GetCDCChar(uint8_t* data)
{
    int16_t r = CDC_Device_ReceiveByte(&VirtualSerial_CDC_Interface);
    if (r >= 0)
    {
        *data = r;
        return 1;
    }
    return 0;
}

void SendCDCChar(uint8_t data)
{
    Endpoint_SelectEndpoint(VirtualSerial_CDC_Interface.Config.DataINEndpoint.Address);
    CDC_Device_SendByte(&VirtualSerial_CDC_Interface, data);
}

void InitCDC()
{
    MCUSR &= ~(1 << WDRF);
    wdt_disable();
    clock_prescale_set(clock_div_1);
    USB_Init();
}

void EVENT_USB_Device_Connect(void)
{
}

void EVENT_USB_Device_Disconnect(void)
{
}

void EVENT_USB_Device_ConfigurationChanged(void)
{
    bool ConfigSuccess = true;
    ConfigSuccess &= CDC_Device_ConfigureEndpoints(&VirtualSerial_CDC_Interface);
}

void EVENT_USB_Device_ControlRequest(void)
{
    CDC_Device_ProcessControlRequest(&VirtualSerial_CDC_Interface);
}

void EVENT_CDC_Device_LineEncodingChanged(USB_ClassInfo_CDC_Device_t* const CDCInterfaceInfo)
{
}
Docker
Imagine you want an asterisk system complete with mariadb and apache but you don't want to
install all that on your day-to-day system. You could create a VM. but vms are heavy and have quite some overhead.
What about backups? you can't copy live running image (not with qemu at least).
Enter Docker. Docker makes this really simple. Docker encloses an environment like a chroot would. But
it acts more like a vm. With docker, the equivalent of a vm is a container. You create your
filesystem and install the needed software in your container and run it. But Docker lets you run 1 command
only. You start the container, the command executes, in its environment, and the container stops. All this using
the host's kernel but separated with namespaces and cgroups. Nothing prevents you from running a script as the command.
So you make a script that starts httpd and asterisk then load bash. the container will run as long as bash doesn't exit.
so if you attach your session on the container and "exit" bash, the container will stop amd asterisk and httpd will shutdown.
The container does not start "init" (unless it's the command you chose to invoke) so it's not like an entire OS is
brought up. Only the command you run is ran in the container's FS but with the host's kernel
Docker allows you export running containers to a tarball. the tarball contains the entire FS of the container (not the memory)
You can then import it anywhere where Docker runs.
Installing docker on slackware
These are the instructions for installing docker 1.7.0 on slackware 14.1 with kernel 3.11.1.
I also tried with slackware 14.0 but the rc.S script does not mount the cgroup hierarchy properly
So I modified it to do it like in 14.1
I could not get it to work with kernel 3.10.17 and did not bother to troubleshoot since I had
a 3.11.1 on hand. 1.7.0-rc1 did not work for me. I needed commit 6cdf8623d52e7e4c5b5265deb5f5b1d33f2e6e95 in.
So I cloned the bleeding edge from git but then 2h later rc2 came out.
Pre-requisites
Before anything, you should make sure that your kernel is compiled with
- CONFIG_DM_THIN_PROVISIONING
- CONFIG_BRIDGE
- CONFIG_BRIDGE_NETFILTER
- CONFIG_MEMCG
- CGROUP_DEVICE
- CONFIG_NF_NAT_IPV4
- NF_NAT_IPV4
- IP_NF_TARGET_MASQUERADE
- IP_NF_TARGET_NETMAP
- CONFIG_IP_NF_TARGET_REDIRECT
- CONFIG_DEVPTS_MULTIPLE_INSTANCES
- CONFIG_MACVLAN
- CONFIG_VETH
- CONFIG_NETFILTER_XT_MATCH_ADDRTYPE
- CONFIG_BLK_CGROUP
- CONFIG_CGROUP_PERF
- CONFIG_CFS_BANDWIDTH
- CONFIG_EXT4_FS_POSIX_ACL
- CONFIG_EXT4_FS_SECURITY
- BLK_DEV_THROTTLING
I actually made a script to enable all those settings
#!/bin/sh
CFG=("CONFIG_DM_THIN_PROVISIONING" \
     "CONFIG_BRIDGE" \
     "CONFIG_BRIDGE_NETFILTER" \
     "CONFIG_MEMCG" \
     "CGROUP_DEVICE" \
     "CONFIG_NF_NAT_IPV4" \
     "NF_NAT_IPV4" \
     "IP_NF_TARGET_MASQUERADE" \
     "IP_NF_TARGET_NETMAP" \
     "CONFIG_IP_NF_TARGET_REDIRECT" \
     "CONFIG_DEVPTS_MULTIPLE_INSTANCES" \
     "CONFIG_MACVLAN" \
     "CONFIG_VETH" \
     "CONFIG_NETFILTER_XT_MATCH_ADDRTYPE" \
     "CONFIG_BLK_CGROUP" \
     "CONFIG_CGROUP_PERF" \
     "CONFIG_CFS_BANDWIDTH" \
     "CONFIG_EXT4_FS_POSIX_ACL" \
     "CONFIG_EXT4_FS_SECURITY" \
     "BLK_DEV_THROTTLING");

for i in ${CFG[*]};
do
    sed -i "/^# *$i/c\\$i=y" $1
done
Maybe some other flags need to be set on your kernel, but these were all the ones I was missing.
There is a uitlity that you can download to check those settings: https://github.com/docker/docker/blob/master/contrib/check-config.sh
Download, compile, and prepare the environment
At first, I tried downloading the binaries but docker was complaining about "Udev sync is not supported".
I found out that was because the binary is statically link and it causes some problems that I didn't care to look
into. So I opted for building from source. The first step is to get "go". I didn't want to leave this on my
system so I just put it in a temporary place and then deleted it.
wget https://storage.googleapis.com/golang/go1.4.2.linux-amd64.tar.gz
tar -zxf go1.4.2.linux-amd64.tar.gz
mv go /opt

#You should make that permanent if you intend to keep Go after building Docker
PATH=$PATH:/opt/go/bin
GOPATH=/opt/go:/opt/go/src/github.com/docker/docker/vendor

# download docker source.
wget https://github.com/docker/docker/archive/v1.7.0-rc2.tar.gz
tar -zxf v1.7.0-rc2.tar.gz
cd docker-1.7.0-rc2

#docker won't build because there is a header file that won't be found. There is a patch
#for that but let's do it manually here:
sed -i "/ioctl\.h/c\#include \r\n#include \r\n#include \r\n#include \r\n#include \r\n" daemon/graphdriver/btrfs/btrfs.go

#note that DOCKER_GIT_COMMIT needs to match the version you have downloaded
GOROOT=/opt/go AUTO_GOPATH=1 DOCKER_GITCOMMIT="395cced " ./hack/make.sh dynbinary
cp bundles/1.7.0-rc2/dynbinary/docker-1.7.0-rc2 /usr/sbin/docker
cp bundles/1.7.0-rc2/dynbinary/dockerinit-1.7.0-rc2 /usr/sbin/dockerinit

#remove go... or not. It's up to you. If you leave it there, you might want to permanently add it to your PATH
rm -Rf /opt/go
Prepare network bridge
In my case, since I was already using KVM/qemu, I had a bridge alrady setup.
But this is what would be needed
#create bridge
brctl addbr br0
ifconfig eth0 down
ifconfig br0 192.168.1.253 netmask 255.255.255.0 broadcast 192.168.1.255 up

# add eth0 as member of the bridge and bring it up.
brctl stp br0 off
brctl setfd br0 1
brctl sethello br0 1
brctl addif br0 eth0
ifconfig eth0 0.0.0.0 promisc up
# setup default gateway.
route add default gw 192.168.1.1
You might want that last example to run at boot time. There is a way to setup a bridge with the init scripts but I just added those lines in rc.local before launching the docker daemon.
There is currently no easy way to assign a static IP to your container. Docker will choose an IP
in the range of you bridge. But this isn't perfect. It seems to pick some addresses that are already used on my network. Issue 6743 on githubis opened for that.
But for the time being, I've hacked the code to make this possible. I won't create a pull request since
they are already working on a more elegant solution. But meanwhile, you can download my fork if you need it.
My fork on github.. That repo contains the patch
to build on slackware and also adds a "--ipv4-adress=A.B.C.D" option to docker run.
Auto start
Finally, you should add this in your rc.local script.
/usr/sbin/docker -d -b br0&
Building a container, running it and doing backups
My use case
What I'm looking to do is to isolate my home automation services in one container
that I can easily transport from one computer to another (or even to a VM). In case
I get a hardware failure, I want to reduce the downtime of my house services. Those include
Asterisk, httpd, MariadDB, CouchDB, DHAS, cron jobs,
and some more. I want to be able to make a daily backup of the container and always be able to
launch it from somehwere else where Docker is installed.
Creating a container
docker run vbatts/slackware:14.1 -ti /bin/bash
That command will create a container from a base image "slackware 14.1" from docker hub.
The image will be downloaded automatically. Then bash will be invoked. the -t -i flags
will give you an interactive TTY attached so you will be able to interact with bash.
From there, install whatever you need in the container. Download gcc, install it, etc. Once you
are done, exit bash. By exiting bash, the container stops. You can now commit your changes to a
new base image
docker commit ContainerID awesomeNewImage
Now you have a base image of your own that you can share with other people. Now create another container
for your real use case from the base image.
docker run -tid --restart=always awesomeNewImage /root/start.sh
The -d flag runs the contain in the background. You can access it using "docker attach".
--restart=always will make the container restart automatically when you exit it and when
the docker daemon starts (after a host reboot for example). When you were setting up
you base image, you could have created a start.sh script that invokes asterisk, httpd, mysqld and couchdb then bash.
To detach from the container without stopping it (leaving your command running) you can Ctrl-P, Ctrl-Q.
Backup/Restore
An easy way to backup is to regularly export the container (Cron job?).
docker export -o backup.tar
This will create a tarball container the entire filesystem of your container.
Then to restore, either locally or on some other machine runner docker:
cat backup.tar | docker import - restoredbackup
