I AM NOW HOSTING MY OWN DNS AND MAIL SERVERS ON AMAZON EC2
2012-09-22

Using an Amazon EC2 virtual machine, I wanted to host my own domain by doing as much as I could myself. By that,
I mean that I wanted to host my own DNS server, mail server and web server. So after registering a new domain name,
the first thing I did was to change the nameserver of that domain to use my own server instead of the registrar's.
After that, all the work is done on my EC2 machine. Note that for this to work, I needed to unblock TCP port 25 and 53
and also UDP port 53 on my virtual server. This can be done in the EC2 management console under the "security groups"
section.
Configuring the DNS server
First thing to do is to add the new zone definition in /etc/named.conf. Let's assume that I registered
"exampledomain.ca".
zone "exampledomain.ca" IN {
        type master;
        file "exampledomain.ca";
};
Then I need to define the zone in /var/named/exampledomain.ca. I wanted to create a subdomain called "www"
so that my web server could be accessible from www.exampledomain.ca. I needed an MX record that points
to the mail server that is also hosted on the same server as the DNS server. For this example, let's
assume that the public IP address of my server is 1.2.3.4.
$TTL    300
@           IN SOA  exampledomain.ca. www.exampledomain.ca. (
                    2012220104      ;
                    1H      ; refresh
                    15M     ; retry
                    1W      ; expiry
                    1D )        ; minimum

            IN NS   ns.
            IN A    1.2.3.4
            IN MX 10 mail

ns              IN A 1.2.3.4
www             IN A 1.2.3.4
mail            IN A 1.2.3.4
Mail server
after looking for a solution to host multiple domains with virtual mailboxes that are not associated
with a unix account, I discovered that that postix might be better for the job than sendmail.
after installing postfix and setting it to run automatically at boot time, we need to configure
the /etc/postfix/main.cf file. I am only telling it to listen to all network interface
and where to look for the list of domains we are hosting and the mailbox definition.
The other nice thing about postfix VS sendmail is that you can easily add more mailboxes/forwards and domains
without having to restart postfix. This is very usefull if you wanna make a webpage on which users can
create their own mailboxes and add their own domains. But the nicest thing of all is that you
can use a mysql server (or several other kinds of DB) so that your web site can configure the server
more easily. But for now, I will stick with scripts. Here is an example of my main.cf script:
queue_directory = /var/spool/postfix
command_directory = /usr/sbin
daemon_directory = /usr/libexec/postfix
data_directory = /var/lib/postfix
mail_owner = postfix

# listen to all interfaces so we can accept incomming connection from LAN and WAN.
inet_interfaces = all
inet_protocols = all
mydestination = $myhostname, localhost.$mydomain, localhost
unknown_local_recipient_reject_code = 550
alias_maps = hash:/etc/aliases
alias_database = hash:/etc/aliases
debug_peer_level = 2
debugger_command =
        PATH=/bin:/usr/bin:/usr/local/bin:/usr/X11R6/bin
        ddd $daemon_directory/$process_name $process_id & sleep 5
sendmail_path = /usr/sbin/sendmail.postfix
newaliases_path = /usr/bin/newaliases.postfix
mailq_path = /usr/bin/mailq.postfix
setgid_group = postdrop
html_directory = no
manpage_directory = /usr/share/man
sample_directory = /usr/share/doc/postfix-2.6.6/samples
readme_directory = /usr/share/doc/postfix-2.6.6/README_FILES

# mailboxes will be saved in /var/vhosts
virtual_mailbox_base = /var/vhosts

#/etc/postfix/vmbox will contain the list of mailboxes
virtual_mailbox_maps = hash:/etc/postfix/vmbox

#/etc/postfix/vdomains will contain the list of domains we are accepting mail for.
virtual_mailbox_domains = hash:/etc/postfix/vdomains
virtual_alias_maps = hash:/etc/postfix/valias
# The /var/vhosts folder must be writeable by user 4000 and group 4000
virtual_uid_maps = static:4000
virtual_gid_maps = static:4000
A note on postifx lookup tables. Postifx is great because it lets use use different type of lookup tables.
In the example posted above, I use hash:/etc/postfix/valias. This is a reference to a Berkely DB file.
You need to create a text file with key/pair values separated by a space and generate a DB with the
"postmap" command in order to use this. But if you want to use another table type such as a mysql table,
then you could specify mysql:/etc/postfix/valias. But in that case, the "valias" file's content would be different.
It would contain information on how to access the database table.
More information on different types of tables can be found here: http://www.postfix.org/DATABASE_README.html
The virtual_uid_maps and virtual_gid_maps lines indicate that the mailboxes inside /var/vhosts will be owned
by 4000:4000 on the system. This means that you have to create a user with ID 4000 and change ownership
of the base folder to that user:group
useradd virtualmailbox -u 4000
chown virtualmailbox:virtualmailbox /var/vhosts
The virtual_mailbox_domains line indicates that postfix needs to look into that file to
find the list of domains it is accepting mail for. Everytime that you modify the vdomains of vmbox file,
you need to rebuild the hash database by issuing the "postmap /etc/postfix/vdomains" command. Of course,
you would replace "vdomains" with "vmbox" if you need to rebuild the vmbox database. virtual mailboxes
are files that will be stored on the server. But if you need to forward to another address, then you
will need aliases. I'm not sure why, but I discovered that you should not use "virtual_alias_domains"
if you want to use mailboxes and aliases for the same domains. Only list the domains in "virtual_mailbox_maps".
# This file will be compiled by the "postmap" tool. It needs
# to contain 2 columns on each line. Since this is just a list
# of domains, we only need one column but the tool will expect 2.
# So you can put anything you want in the second column. I decided
# to put the domain name a second time.
#
exampledomain.ca exampledomain.ca
vmbox file
#because there is a slash at the end of the path, mail will be saved in maildir format
admin@exampledomain.ca  exampledomain.ca/admin/

#because there is no slash at the end of the path, mail will be saved in linux mbox format
test@exampledomain.ca   exampledomain.ca/test
valias file
user1@exampledomain.ca  user1@gmail.com
user2@exampledomain.ca  user2@yahoo.com
Automation
It could become very handy to automate the process of adding domains and user mailbox though a perl of php script.
The best way to do it would be by using a database, but let's see how to do it with files first.
Files
- Add the domain name in /etc/postfix/vdomains
- Add mailbox in /etc/postfix/vmbox
- Add forwarding addresses in /etc/postfix/valias
- Run "postmap /etc/postfix/vdomains"
- Run "postmap /etc/postfix/vmbox"
- Run "postmap /etc/postfix/valias"
Of course, this requires that the script locks the files to prevent two process from accessing
the same files at the same time. And also, it would be better to schedule the "postmap" instead or running
it everytime because if you have a large system where users create several mailboxes in 1 minute, you would
want to wait a little bit before running postmap oherwise you would add a great load on your CPU.
Database
With this method, your scripts don't need to lock any files and you don't need to schedule a "postmap".
All you need to do is to insert a mailbox/domain in the database and the change is instantaneous. In my
opinion, this is the ideal way of doing thing if you have a server that hosts several domains and you allow
users to create their own mailboxes. For an example on how to do this, you can refer to this post I did: Building a hosted mailserver service
DEPLOYING A LAYER3 SWITCH ON MY NETWORK
2012-08-20
Lately, I bought a Cisco 3550 switch with 48 ports. My goal was to have
a switch that could do the inter-vlan routing instead of relying on the router.
This way, if my router goes down, I only lose my internet connection but the
voice network and data network on my LAN can still function properly. I was
also using the cisco router as my DHCP server, but now it is running on my switch.
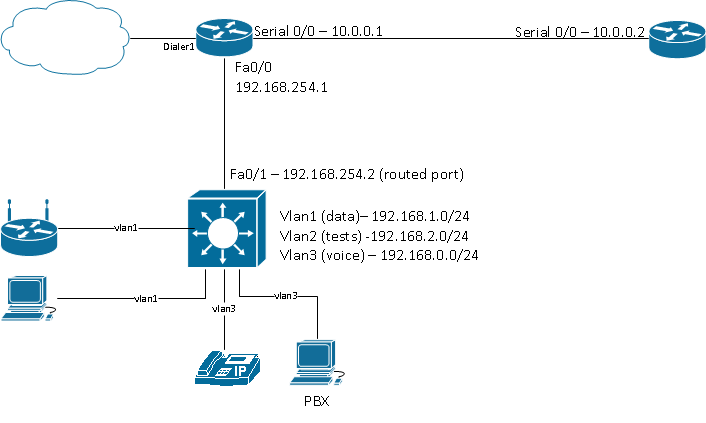
The first thing that needs to be configured is the SVI interface. SVI stands for Switch Virtual Interface. It represents a interface to a vlan. You need one SVI for each VLAN that you
want to provide routing on. By creating an SVI, you assign it an IP address. This IP address
is the address that you will use as the default gateway on all nodes on your VLAN.
! create SVI for VLAN 1
interface Vlan1
 ip address 192.168.1.1 255.255.255.0

! create SVI for VLAN 2
interface Vlan2
 ip address 192.168.2.1 255.255.255.0
Since I wanna host my DHCP server on the switch now instead of the router, I can take the same configuration I had
on the router at apply it on the switch.
ip dhcp excluded-address 192.168.1.1 192.168.1.99
ip dhcp excluded-address 192.168.1.150 192.168.1.255
!
ip dhcp pool pool_vlan1
   import all
   network 192.168.1.0 255.255.255.0
   default-router 192.168.1.1
   dns-server 192.168.254.1
!
ip dhcp pool pool_vlan2
   import all
   network 192.168.2.0 255.255.255.0
   default-router 192.168.2.1
   dns-server 192.168.254.1
Notice that the DNS server (forwarder) is on the router and not on the switch. Usually, the
DNS server in my setups was on the same device as the subnet's gateway. So on all the devices that were assigned
a static IP on my network, I had to change the IP address of the DNS server.
Connecting the router and the switch
There are two ways of doing this: SVI or routed port.
SVI
With this method, I would create a VLAN 10 on my switch for subnet 192.168.10.0/24. I would
assign an IP address from that subnet to my router's LAN interface and connect it to an access
port that is part of VLAN 10 on the switch.
Routed port
A routed port is a port that behaves like a port on a router. It handles layer 3 protocols. Using this method,
you need to create a small network between your router and the switch. You can set the port to become a router port
by using the "no switchport" command when configuring your interface. Then, you assign an IP address to that interface.
This small network only has two members in it, so it is a /30 subnet. I used 192.168.254/30 and used two IPs in there.
So basically, with a routed port, we are creating a peer-to-peer network that will bridge the networks known by the router and the ones known by the router. On the switch, I would configure the routed port like this:
interface fast 0/1
 no switchport
 ip address 192.168.254.2 255.255.255.252
Either way, I need to create routes on the router because the router will not be aware of the
other subnets on my switch. It will only be aware of the peer-to-peer network (if using a routed port) or
the subnet for the vlan it is part of (if using SVI). But it will not know anything about the other subnets in other
vlans.
At first, I thought about assigning the router's LAN port an IP address in the VLAN1 subnet and connect
it to an access port for VLAN1 on the switch. But then, since I have an ACL that prevents VLAN2 from talking
to VLAN1, the VLAN2 wouldn't have access to the router, so no internet for VLAN2. So I thought about
creating a VLAN 10 in which my router would be part of, in a new subnet 192.168.254.0/30. Only
the SVI on the switch and the physical port on the router would belong to that subnet. But why do this
when a routed port does exactly that anyway? So I chose to go with the routed port even though it does the same
thing as the SVI method
Routes
The router only know about network 192.168.254.0/30. But because we are doing TCP/UDP port forwarding,
it needs to know about 192.168.1.0, 192.168.2.0, 192.168.3.0 etc...
So I tell the router: Whatever you have for 192.168.0.0/16, throw it on the FastEthernet0/0
interface. Whatever else you got, ship it on the WAN (my DSL modem). This is done like this:
ip route 192.168.0.0 255.255.0.0 Fast0/0
ip route 0.0.0.0 0.0.0.0 Dialer1
For the switch, things are really simple. The switch knows how to route between VLANs because we have created an SVI for each VLAN. We just need to tell it to send whatever does not belong
to a known subnet to the router, through the routed port:
ip route 0.0.0.0 0.0.0.0 Fast0/1
ACD SERVER WITH RESIPROCATE
2012-07-09
This is another project I've been working on using resiprocate.
I'm using this ACD server with Asterisk. All devices, including the ACD server
are talking with asterisk. The ACD server registers with asterisk just like any other phone would.
When my gateway (FXO) sends a call to asterisk, asterisk routes it
to the ACD server. When an agent logs on the ACD, the ACD server checks the contact header and establishes a
presence subscription to that contact. In my case, this is always going to be an extension on Asterisk.
Features
Feature list:
- multiple queues
- Agents can be members of many queues
- Queues are called with AOR (i.e: telemarkerqueue@acdserver.local)
- most-idle agent routing (MIA)
- redirect on no answer (to next MIA, with configurable timeout)
- music while waiting
- welcome message + periodic announcements while in queue
- supports g.711 uLaw only
- supports SIP info only for DTMF
- REST api with JSON formatted responses
- list of queues and calls with state, source/destination etc.
- list of agents with state, idle time etc.
Unfortunately, there is too much I want to do so here is the list of other features I would
like to add when I find the time
- Adding agents & queues dynamically without restart
- Ringall queues
- Calling an agent directly (agent@acdserver.local)
- Force a call out of the queue using REST api (unattended transfer to any device on same call server).
- Use one thread only for all RTP sessions
- Prevent agent to log on more than one phone and more than one agent on same phone
whatever codec I use)
Using it
Here is a typical scenario:
- Agent dials *44 (asterisk routes this to sip:acdlogin@acdserver.local as per dialplan)
- ACD Server answers and prompts for agentID
- ACD finds agent in internal list
- ACD subscribe with calling phone (using contact header).
- agent becomes available when a notify indicates IDLE.
- agent dials *45 (asterisk routes this to sip:acdlogout@acdserver.local as per dialplan)
- ACD unsubscribes and set Agent as unavailable
Asterisk
In sip.conf, under the profile for my acdserver, I set:
subscribecontext=acdpresence
context=acdserver
When phone1 calls the acdserver, the contact header will appear to be sip:phone1@asterisk.local to the ACD server (because asterisk is a B2BUA). So when the ACD server will try to subscribe to that device, it will need to have a corresponding entry in the dialplan.
This is how I setup my dialplan:
[acdserver]
exten => _.,1,Dial(SIP/${EXTEN})

[acdpresence]
exten => _.,hint,SIP/${EXTEN}
It is discouraged to use "_." but currently, this is my only option. I'll try to find something. But this
is because I don't have a naming convention for my devices. If all your devices are called phone1, phone2, phone3 etc. then you could use exten => _phone.,1,Dial(SIP/${EXTEN})
API
The server listens for incomming requests in the form of a RESTful API. The responses are sent as JSON data. I prefer JSON over xml since it is easier to parse with javascript and it also looks nicer in my opinion. I used my own json library which you can also find on this website.
The server currently supports 2 requests.
curl -X GET "http://127.0.0.1:242/queues" would return
{
    "queues": [
        {
            "name": "queue1",
            "calls": [
                {
                    "id": "335099e931f09ad46ea75b8a451ad65d@192.168.0.3",
                    "state": "assigned",
                    "from": "gateway@192.168.0.3",
                    "to": "queue1@192.168.0.3:5071"
                }
            ]
        },
        {
            "name": "queue2",
            "calls": [ ]
        },
        {
            "name": "queue3",
            "calls": [ ]
        }
    ]
}
curl -X GET "http://127.0.0.1:242/agents" would return
{
    "agents": [
        {
            "id": "2771",
            "state": "idle",
            "idletime": "14",
            "device": "",
            "memberof": ["queue1","queue2","queue3"]
        },
        {
            "id": "2772",
            "state": "loggedout",
            "idletime": "0",
            "device": "",
            "memberof": ["queue2"]
        },
        {
            "id": "2773",
            "state": "loggedout",
            "idletime": "0",
            "device": "",
            "memberof": ["queue3"]
        }
    ]
}
Download
This code is experimental and is a mess right now. A lot of it can change at any time. The only libraries you will need is resiprocate and ortp.
download
C++ JSON LIBRARY
2012-07-09
After spending some time trying to find a good JSON library for C++, I realized that all
the libraries out there are too heavy to use. Some of them look very good but their usage looks heavy.
So I decided to write my own. My library is compliant with RFC 4627 except that it doesn't support unicode and numbers in exponential format .
Seriously, this library is really easy to use and has no dependencies (other than STL). I cannot find another C++ json library that is that simple to use.
Usage examples
The library exposes one object that is used to do everything you need. the "JSON" object. So there is no
need to include a whole bunch of header files and use a whole bunch of class. You only need the JSON object to do everything you need. The object exposes these methods:
| Method | Description |
|---|
| JSON& operator[](int i); | Access a list item |
| JSON& operator[](std::string str); | Access an object member |
| std::string str(); | Get value of item |
| void parse(std::string json); | Parse a JSON document |
| std::string stringify(bool formatted=false); | serialize JSON object |
| JSON& addObject(const std::string& name=""); | Add object |
| JSON& addList(const std::string& name=""); | Add List |
| JSON& addValue(const std::string& val,const std::string& name=""); | Add string value |
| JSON& addValue(int val, const std::string& name=""); | Add integer value |
| JSON& addValue(double val, const std::string& name=""); | Add double precision FP value |
Reading a JSON document
The library is very simple to use. Just compile it and it will output a "test" executable and a .a that
you can link against. Then let's say you have the following JSON document:
{
    "obj1":{
        "member1":[
            "val5",
            "val4"
        ],
        "member2":"val3"
    },
    "list1":[
        "listItem1",
        "listeItem2",
        {
            "listObject1":"val2"
        }
    ],
    "value1":"val1"
}
The following code is an example on how to use the library:
JSON json;
std::string val;
std::string str = someFunctionThatReadsAJSONDocumentFromFileOrNetworkOrWhatever();
json.parse(str);
val= json["obj1"]["member1"][0].str(); // would give "val5"
val= json["list1"][1]["listObject1"].str(); // would give "val2"
Each access to a member will return a JSON object. So you only have 1 class to use at all time.
So you can create a new variable each time or you can access all members by chaining the function calls.
val= json["obj1"]["member1"][0].str(); // would give "val5"
JSON& j1 = json["obj1"];
JSON& j2 = j1["member1"];
val = j2[0].str(); // would give "val5"
val = j2.str();    // would give "{list}"
val = j1.str();    // would give "{object}"
Invalid paths
The nice thing about this is that you don't need to worry about null objects. If you try to
access an invalid member, you will get an invalid JSON object. But if you try to access another
member from an invalid JSON object, you will also get an invalid JSON object. You will never
get a NULL object that could crash your application.
val= json["obj1"][1].str(); // would give "{invalid}" because obj1 is an object, not a list
val= json["obj2"].str(); // would give "{invalid}"
val= json["obj2"]["member2"].str(); // would also give "{invalid}"
val= json["list"][100].str(); // would give "{invalid}"
val= json["list"][100]["something"].str(); // would also give "{invalid}"
Writing a JSON document
There are 3 methods provided to add items in the JSON document:
- addObject(const std::string& keyName="")
- addList(const std::string& keyName="")
- addValue(const std::string& val, const std::string& keyName="")
All 3 functions have an optional keyName parameter. That is because if you add an item
to an Object, you need to specify the key name that will be used in the parent. Again, I wanted
to have a simple interface without having to force the programmer to use different classes if using a list
or an object. So this here is the behavior of those function calls if you provide the key name or not.
| Action | Result |
|---|
| addXXX on Object and provide key name | item added and parent uses keyName |
| addXXX on Object and don't provide key name | item added and a key name is auto generated |
| addXXX on List and provide key name | item added and key name ignored |
| addXXX on List and don't provide key name | item added |
| addXXX on Value and provide key name | operation is ignored |
| addXXX on Value and don'tprovide key name | operation is ignored |
After adding items in the json object, you can then serialize it with stringing().
JSON json;
json.addObject("obj1");
json.addList("list1");
json.addValue("val1"); // key autogenerated because key name not provided
json["list1"].addValue("item1");
json["list1"].addValue("item2");
std::string val = json.stringify(true);
Would output:
{
    "obj1":{
    },
    "list1":[
        "item1",
        "item2"
    ],
    "key2":"val1"
}
Download
Project can be found on github